Tuesday, May 31, 2011

High Dynamic Range Photos (HDR)

Siding HDR


Exposure: +2


Exposure: -2


Exposure: 0


Main Street HDR


Exposure: 0


Exposure: -2


Exposure: +2


Barn HDR


Exposure: 0


About this Post: A High Dynamic Range Photo (HDR) is a photo that is a combination of multiple photos with different exposures. The framing and composition is the same in all three but the exposure settings are different. This allows you to get the best lights, darks and mid-tones in your final picture.

Title: Siding
Date/Time: 5/25/11, 11:26 AM
Location: Bannack, MT
F-Stop: f/3.5
Shutter Speed: 1/320, 1/3200, 1/1000
Camera: Canon EOS 60D
Other: Taking the three photos and using Dynamic Photo I combined them into a High Dynamic Range (HDR) Photo. This allowed me to use all of the lightest and darkest areas and all the mid-tones int he photos to get something with a lot of contrast. I also desaturated the colors to bring out the grays in the sky.

Title: Main Street HDR
Date/Time: 5/25/11, 11:00 AM
Location: Bannack, MT
F-Stop: f/5.0
Shutter Speed: 1/2500, 1/8000, 1/640
Camera: Canon EOS 60D
Other: Using Dynamic Photo I was able to combine all three pictures create an HDR. I saturated the colors to bring out the reds more.

Title: Barn HDR
Date/Time: 5/25/11, 2:41 PM
Location: Bannack, MT
F-Stop: f/3.5
Shutter Speed: 1/40
Camera: Canon EOS 60D
Other: In this HDR I only took one picture and created an HDR by changing the exposure afterwards. I used Dynamic Photo to create this HDR. This was taken inside a barn looking up. I saturated the colors to bring out the reds.

Macro Abstract

Texture
Trap


Trap/Texture Blend


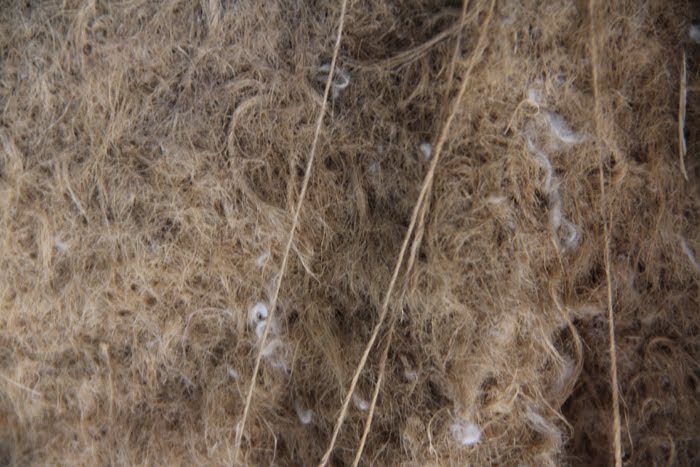
About this post: For this post I was to take 2 macro shots and then combine them using blending modes in Photoshop. These pictures were taken in Bannack, Montana and there is more information in about the pictures in the information below.

Title: Texture
Date/Time: 5/25/11, 2:28 PM
Location: Bannack, MT
F-Stop: f/5.6
Shutter Speed: 1/5
Camera: Canon EOS 60D
Other: This is a macro shot of some old carpet that was in a building back in one of the old buildings in Bannack, Montana. It was hanging on the wall and looked like it was supposed to be a decoration.

Title: Trap
Date/Time: 5/25/11, 2:10 PM
Location: Bannack, MT
F-Stop: f/1.8
Shutter Speed: 1/250
Camera: Canon EOS 60D
Other: This is a close up picture of an animal trap.

Title: Trap/Texture Blend
Date/Time: 5/25/11
Location: Bannack, MT
F-Stop: f/1.8
Shutter Speed: 1/250
Camera: Canon EOS 60D
Other: I took both close up pictures into Photoshop and put the texture on top of the trap. Then I changed the blending mode to overlay and added a mask to the texture. I then took the brush tool with black paint and hid the texture from everything except the trap itself.

Reverse Shallow Depth

Foreground

Background


About this post: For this picture the assignment was to take the same picture twice. Once with the foreground in focus and one with the background in focus. This picture was taken in the saloon at Bannack Montana.

Title: Relaxing (Foreground/Background)
Date/Time: 5/25/11, 12:53 PM
Location: Bannack, MT
F-Stop: f/1.8
Shutter Speed: 1/640
Camera: Canon EOS 60D
Other:

Bannack Action Blur & Freeze

Walking
Bridge


About this post: For this post I was supposed to take 2 action shots. One that showed motion blur as the subject was moving and one where the action was frozen. This was done using fast and slow shutter speeds. The pictures were taken in Bannack, Montana.

Title: Walking
Date/Time: 5/25/11, 11:41 AM
Location: Bannack, MT
F-Stop: f/25
Shutter Speed: 1.3
Camera: Canon EOS 60D
Other: This picture was taken in the schoolhouse and originally was supposed to be a ghost picture but there was too much light coming in . I think that it turned out really good. It had a slow shutter speed and I had a person stand in the picture and then walk out when I took the picture.

Title: Bridge
Date/Time: 5/25/11, 12:23 PM
Location: Bannack, MT
F-Stop: f/22
Shutter Speed: 1/250
Camera: Canon EOS 60D
Other: This is a really cool bridge in Bannock Montana. I gave the camera a fast shutter speed and also set it on fast continual pictures and then just took a bunch of pictures at once while my subject was swinging on the bridge.

Bannack Portraits

Bartender


Doorway


About this post: These are some of the portraits that I took while on a trip in Bannack, Montana. The pictures were taken in a saloon where there is really good lighting. More information about the pictures can be found below.

Title: Bartender
Date/Time: 5/25/11, 12:58 AM
Location: Bannack, MT
F-Stop: f/1.8
Shutter Speed: 1/400
Camera: Canon EOS 60D
Other: This picture was taken in the saloon at Bannack Ghost Town in Montana. The Girl in the background is the same girl as the next picture. I wish that I could have shown more of the bar but I couldn't go any further to the right because there was a lot of lighting equipment set up.

Title: Doorway
Date/Time: 5/25/11, 12:56 PM
Location: Bannack, MT
F-Stop: f/7.1
Shutter Speed: 1/250
Camera: Canon EOS 60D
Other: This picture was taken from outside the back door of the saloon. There were too many people taking pictures from inside so I decided to go outside and see what it looked like. Because I am outside the background is completely black.

Sunday, May 22, 2011

Portrait Enhancements

Enhancements
Before Enhancements


After Enhancements


Replace Color
Replace Color Before


Replace Color After (Shirt)


Color Match

Color Match Before
Color Match After


Source Colors


About this Post:
For this post we were required to take portraits and then demonstrate our skills of enhancing these portraits in Photoshop. I removed blemishes, whitened and enhanced eyes. I changed colors of clothing and matched the colors of pictures. I did much more and it is all explained in the "Other" portion of the detail below.

Enhancements
Title: Chanae
Date/Time: 5/13/11, 7:57 PM
Location: West Jordan, UT
F-Stop: f/1.8
Shutter Speed: 1//100
Other: I made many edits to this as you can see. In Camera Raw I adjusted the levels and Saturation. I then took it into Photoshop and removed some blemishes. I used adjustment layers to whiten the eyes and enhance the eyes. I used a surface blur to smooth the skin and I used a brown solid colored layer on the very top with blending mode of soft light. This is a picture of my wife.

Replace Color:
Title: Jumping
Date/Time: 4/23/11, 2:45 PM
Location: Rexburg, ID
F-Stop: f/4.0
Shutter Speed: 1/640
Other: Notice that the color of her shirt in the first picture is purple and in the second it is green. This was done with an Adjustment in Photoshop known as Replace Color. You make a selection and then pick a color in that selection and you can change that color.

Color Match
Title: Smile
Date/Time: 5/13/11, 7:53 PM
Location: West Jordan UT
F-Stop: f/1.8
Shutter Speed: 1/100
Other: For this picture I liked the composition but the lighting wasn't the best so I found another picture with similar but better lighting and used an Adjustment in Photoshop called Color Match to improve the lighting.

Portraits

Emily


Melissa


Sarah


Kylee and Aaron


My Girls


Florist


About this Post: This assignment was to take portraits. These pictures have been taken all throughout the semester. I have a wife and 3 sisters who are beautiful and are easy to photograph. This was fun to do and I learned a lot about Aperture. I am understanding the importance of knowing how to use manual settings so that you can get the picture that you need.


Title: Emily
Date/Time: 4/23/11, 2:42 PM
Location: Rexburg, ID
F-Stop: f/4.0
Shutter Speed: 1/4000
Other: The Subject is my little sister Emily. I did some small enhancements to this picture such as taking away some blemishes and changing the levels

Title: Melissa
Date/Time: 4/14/11, 6:21 PM
Location: Salt Lake City, UT
F-Stop: f/2.2
Shutter Speed: 1/250
Other: The Subject of this picture is my older sister Melissa. This was taken at Temple Square. once again some minor edits were done with levels and blemishes.

Title: Sarah
Date/ Time: 5/14/11, 6:19 PM
Location: Salt Lake City, UT
F-Stop: f/2.2
Shutter Speed: 1/100
Other: The subject of this is my little sister Sarah. She recently got off her mission from Chile which is why she is so tan in these pictures. I did some minor edits to levels but the eyes and hair have had no changes to them. She claims that she learned how to smile with her eyes by watching America's Next Top Model.

Title: Kylee and Aaron
Date/Time: 5/21/11, 8:06 PM
Location: Rexburg, ID
F-Stop: f/1.8
Shutter Speed: 1/50
Other: The subjects are my friends Kylee and Aaron. They moved in across the hall from us in our first apartment and we have been very good friends. This was taken up by the Rexburg Temple. I have discovered that around 8:00 the best lighting occurs.

Title: My Girls
Date/Time: 5/14/11, 6:26 PM
Location: Salt Lake City, UT
F-Stop: f/5.6
Shutter Speed: 1/400
Other: These are 4 out of the 5 most influential girls in my life. My mom isn't in this picture, she is the 5th. From Left to Right there is Chanae (my wife), Emily (littlest sister), Sarah (little sister) and Melissa (older sister). With this kind of a group it is pretty much impossible to get a bad picture

Title: Florist
Date/Time: 5/21/11, 8:13 PM
Location: Rexburg, ID
F-Stop: f/1.8
Shutter Speed: 1/40
Other: Kylee is going into floral design and horticulture so part of her job is taking care of flowers.